A Wedding Pro’s Guide to Flat Lays
It wasn’t too long ago when most wedding pros couldn’t tell you what a flat lay was—even though photographers have long been taking photos of wedding invitations. And while this style of photo once used to be something of little importance, now it is more than having a moment! From being included in select galleries that make it to print and being all over social media to there being lots of products to help you style them and full workshops to really dive in, it would be hard to argue that flat lay photography isn’t an important element in wedding branding and marketing. So today, we want to make sure you have the right styling tools and savvy to create brand-building ones—every time. Read on to learn how to style a flat lay and so much more.
What is a flat lay?
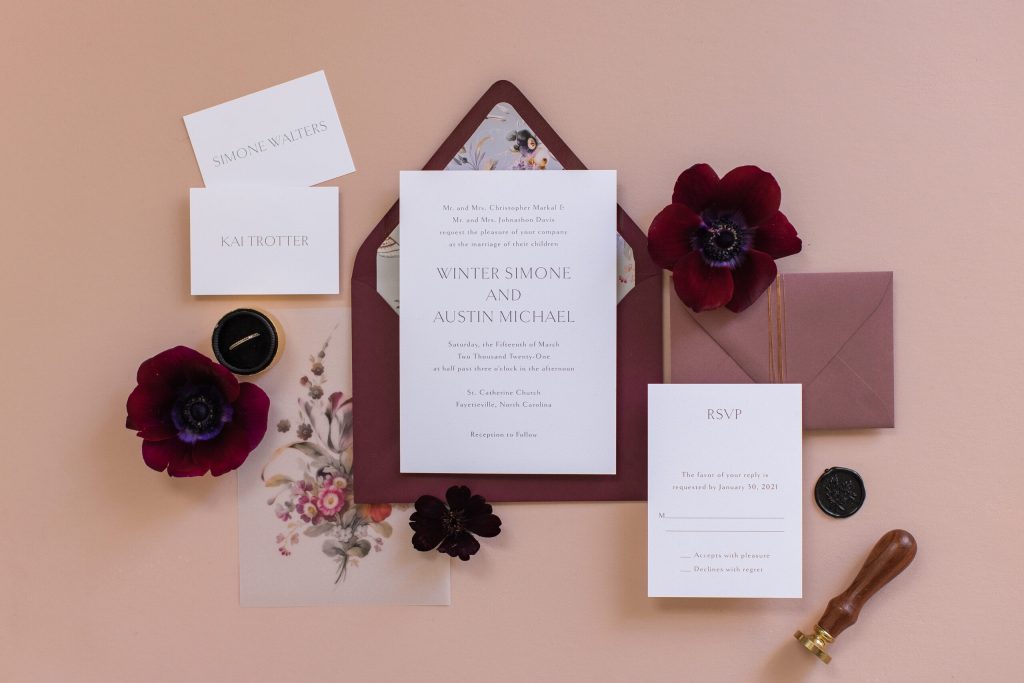
A flat lay photo is actually a simple concept—it’s an image of styled items shot directly from above by a photographer. And while flat lays (or lay flats as some people call them) have long been created by product-based businesses, service-based businesses and wedding industry professionals have started adding them to shot lists as a creative way to show off their work. From branded flat lays of business cards to wedding flat lays of invitation suites and jewelry details, flat lay photos are popping up on Storefronts, social media feeds, websites and publications across the country.
Your flat lay should tell a story
We talk about goals quite often here at WeddingPro, and here’s another place where it makes sense to reinforce the importance of them. Because the best flat lays are not just pretty—they tell a story about the couple and their wedding celebration. So, before you put the first prop down, ask yourself, “What am I trying to communicate here?” Are there elements in the stationery design that are tied to the couple’s story? “How can I highlight those?” Is this a destination wedding weekend filled with festivities? “Where can I pull in details to capture the entirety of the experience?”
After thinking about your goal for what you’re going to style and the details you can pull in, be sure to put the main character of your story (likely the invitation card) in the center of your vignette. Doing so ensures it is anchored as the focal point, and you can style the supporting parts of the story around it.
Pro tip: Don’t force things into your flat lay that don’t really belong. Not everyone needs a ribbon and shoes next to a wedding invitation if it doesn’t make sense—it’s best to style fashion details separately.
The lighting needs to be just right
Before you ever sit down to start styling your vignette, it’s imperative that you set yourself up in a well-lit location—trying to move a flat lay after it is set is almost impossible. So, in the case you need to get started when the photographer is not available to help you find the right spot (or you’re doing it all on your own), here is what you need to know about lighting.
- Choose a spot with natural (sun) light as opposed to artificial light
- Soft and indirect light is ideal (set up close to a large window or in open shade if possible)
- You can test the light by holding your hand over the surface to see if there is an intense shadow. If there is, it’s best to continue looking
- If there is only a slight or minimal shadow, you should ask the photographer if they can bounce light into the shot with a reflector or white surface
What’s in a well-stocked flat lay styling kit
A gorgeous flat lay starts with something stunning to showcase, but it doesn’t really come together without a well-stocked flat lay styling kit. Because you need something to style on, something to help you create interest and something to tie it all together. And while photographers, wedding planners and stationery designers all may curate slightly different versions for themselves, here are a few foundational pieces you should build your flat lay kit around:
- An organizer (plastic bins with compartments or scrapbook organizers are great options)
- Styling mats and surfaces (Chasing Stone, JRD Artshop and the Locust Collection are popular rollable options)
- Ring boxes and dishes (in neutral colors to make them flexible)
- Ribbon (in the colors your couples tend to use in their designs)
- Acrylic styling blocks (Sourced Co. has a popular line)
- A small step stool in case the photographer needs it
- A portable steamer or flat iron for removing wrinkles from ribbon or textiles
- Misc. details (stamps, wax seals, small props, etc.)
- Misc. tools (dental wax for getting rings to stand, tape, a clean paint or makeup brush to clean dust out of the shot, etc.)
How to refine your flat lay photos
It’s rare to achieve perfection right out of the gate, and it takes time to practice your styling skills. So, after you’ve got your “initial draft” down, the next step is to see what it looks like through the camera (you might be surprised at how different it looks all of a sudden). Pull out your phone, keep it parallel to the floor and take two shots: one vertical and one horizontal. Then evaluate what you see:
- Did you style any elements too close to the edge of the styling surface? If so, pull them in closer since you want to have some negative space around your full vignette
- Does your composition look good in both shots? If not, what can be adjusted?
- Are any of your props “floating” in the shot? If something looks out of place or unintentional, consider removing it
- Are all the important details easily seen and easy to read?
- If you intended for your paper elements to be placed at right angles, are all of your lines straight? This is especially important since it cannot be fixed during the editing process.
- If you styled things to have a more organic or asymmetrical look, is the overall vignette balanced?
A few last flat lay tips
As you can see, there is a lot of nuance to flat lay styling. And as you put these tips to work, we have a few more thoughts to share:
- In general, portrait orientation looks best, but be mindful of capturing a horizontal shot too (this is where not styling to the edge helps)
- Practice a few layouts you know you can accomplish in a short amount of time, since wedding days can be hectic
- If the couple invested in a custom design for their wedding invitation suite, it really deserves more time and attention. Consider scheduling a flat lay session with the photographer to shoot it the day before or after the wedding
- When you are practicing your styling skills and editing images yourself, apps like Lightroom and Pic Tap Go are free and easy to use on your phone
- Flat lay photos are great for marketing content! Use them on your website, Storefronts, social media, Pinterest and informational PDFs
Started reading this piece wanting to learn more about flat lays and find yourself wondering how you can get your hands on more images to help on the marketing front? Read this piece next to learn how to get photos to build your brand when you’re not a photographer.
Photo Credit: Sourced Co.
Let's grow your business together!
Start advertising on The Knot and WeddingWire, the top two wedding planning platforms.
What is new!